Easy Cinnamon Buns

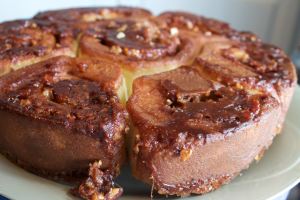
We woke up on Sunday morning wanting cinnamon buns. I pulled this recipe up out of the file and it wasn’t too long before we were enjoying them hot out of the oven.

cinnamon buns

Easy Cinnamon Buns

Dough:

1 teaspoon dry, instant yeast
1 cup warm milk
1/2 cup white sugar
1/3 cup butter, melted
1 teaspoon salt
2 large eggs, room temperature
4 1/2 cups bread flour

Filling

1/2 cup butter
1 1/4 cup dark brown sugar, packed
¼ cup sugar
2 tablespoons ground cinnamon
3/4 cup chopped pecans

Topping:

4 tablespoons butter
¼ cup chopped pecans

Dissolve the yeast in the warm milk in a large bowl. Mix in the sugar, butter, salt, and eggs. Add flour and mix well. Knead the dough into a large ball for about 5 minutes. Put in a bowl, cover and let rise in a warm place about 1 hour, or until doubled in size.

After the dough has doubled in size, turn it out onto a lightly floured surface, cover and let rest for 10 minutes. In a small bowl, melt the butter and then combine sugars, cinnamon and pecans.

Roll dough out into a 16×21 inch rectangle. Brush butter over dough. Sprinkle spread dough with filling mixture.

Working away from you, roll the dough into a tight log and cut into 12 pieces. Place them in a lightly greased muffin tin or a cake pan. (You can leave these overnight in the fridge at this point. Take them out of the fridge 60 minutes before you bake them). Cover and let rise until nearly doubled, about 30 minutes. Meanwhile, preheat oven to 400F.

Melt the butter and brush over tops of buns. Sprinkle with remaining pecans. Bake rolls in a preheated oven until golden brown, about 20-30 minutes.

Let rest in pan for 5 minutes before inverting on serving plate.
Iron Horse Grill – Jackson, MS

I was up in Jackson, Mississippi for an Equality Summit with HRC Mississippi. The event was downtown near the old capitol, so afterwards we walked to the Iron Horse Grill for dinner.

The salsa was very bright and fresh and the waiter confirmed that it is made in house each day. We enjoyed it with two baskets of their tortilla chips and a lovely margarita.

For the main course, I had one of the best chimichanga’s I’ve ever had. Shredded beef wrapped in a toritilla, deep fried and then topped with queso and ranchero sauce. Layers of flavor, all of them good.

IMG_20150829_174445877

Michelle had the shrimp and grits on the servers recommendation. The grits were a local variety and ground extremely fine. The sauce was quite yummy but, because they left the tails on the shrimp, it was a very messy meal to eat. I don’t think cooking with tails on adds that much flavor and taking them off would definitely improve the dining experience.

IMG_20150829_174456315 copy

The staff was knowledgable and attentive and quick with refills.

Afterwards, we wandered through their Mississippi Music Experience. This onsite museum has wax statues, signed memorabilia and audio/visual displays of the state’s musical history and it’s iconic musicians.

I’d definitely recommend the Iron Horse if you’re in the Jackson area.

Thick Cut Ribs

I woke up this morning dreaming of ribs. It might have had something to do with my watching some TV chef boil ribs before going to bed. It was a nightmare what they did to that meat, just so they could have ribs on the table on a weeknight in under an hour. The slab was gray and gross when it came out of the pot and, I’m sorry but there are some things you don’t do fast. As Mae West said, “Anything worth doing is worth doing slowly.”

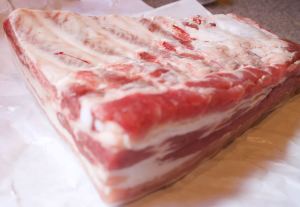
As soon as I could, I moseyed on down to my local butcher, Cleaver & Company. The great thing about going to an actual butcher instead of the grocery store is when, after you explain to them your craving, they empathize. The young man told me he didn’t have a lot of ribs left from the whole pig they had as someone special ordered the ribs but he did have a piece of 5 ribs left over that he could sell me. Perfect! It was 4 lbs of ribs, meat and fat, more than enough for one hungry woman.

raw slab

I put a dry rub on and left the meat on the counter for an hour before I started building the fire. I’m a fan of Emeril Lagasse’s Rustic Rub, although I put on a much thinner layer than I would when grilling pork shoulder. Here is the recipe:

Rustic Rub

8 tablespoons paprika
3 tablespoons cayenne
5 tablespoons freshly ground black pepper
6 tablespoons garlic powder
3 tablespoons onion powder
6 tablespoons kosher salt
2 1/2 tablespoons dried oregano
2 1/2 tablespoons dried thyme

Combine all ingredients and store in an air-tight container. Yield: 2 cups

The trick is keeping the grill low and slow enough to cook the ribs, melt the fat and liquify the connective tissue. The range I was aiming for was 200 degrees F to 250 degrees F. The longer at 225 degrees, the better. This required one whole chimney starter of coals, a few unlit briquets after an hour and again at two hours. I then added half of another chimney of lit coals at hour 3. I added a few more unlit briquets at about 4 and half hours. I used two pieces of hickory chunks – the first at the start and the second after an hour. That was plenty enough smoke.

IMG_9792

I figured 5 hours of indirect cooking based on weight and thickness and it took almost seven. The result only needed a gentle tug to come off the bone and kept some chew to the center sections of meat.

done meat

Bliss!

And my dog is a fan of butcher shops, too. She really enjoyed the chew I got from Cleaver and Company for her (they have a healthy selection of dog food and treats):

11940328_10207656588150679_2316027479302588184_n

Black Olive and Rosemary Focaccia

daisy and rosemaryI was snipping the veritable tree of rosemary out in front of my house after this morning’s rain and day dreaming about what to make with all the trimmings. I rolled a few leaves between my fingers and breathed in the heady scent. The herb of remembrance, it brought to mind a line from Myrtle Reed’s Lavender and Old Lace:

Miss Ainslie gathered a bit of rosemary, crushing it between her white fingers. “See,” she said, “Some of us are like that it takes a blow to find the sweetness in our souls.”

Sweet souled or not, I decided to make a focaccia. This is one of my go to breads as it is so easy and can be made new each time, depending on the toppings you use. I went for rosemary and kalamata olives. Other times, I’ve roasted some garlic or used roasted red pepper from a jar or, even caramelized some onions. It is all good.

Focaccia


focacia

1 package active dry yeast
1 cup warm water (105 to 115°F)
1 tablespoon sugar
3 1/2 cups unbleached bread flour
1 teaspoon salt
1/4 cup good quality olive oil, plus 2 tablespoons, divided
1 1/2 teaspoons chopped fresh rosemary
1/3 cup coarsely chopped pitted black kalamata olives
1/2 teaspoon coarse sea salt
Dissolve yeast in warm water in the bowl of a stand mixer. Add sugar and allow to proof for about 5 minutes. Stir together flour and salt in medium bowl. With mixer on low, gradually add flour to proofed yeast. Slowly drizzle in 1/4 cup oil. Switch to the dough hook and knead the dough for 5 to 10 minutes.

Remove the dough and coat the bowl with small amount of olive oil. Place dough in bowl, turning to coat surface. Cover with damp cloth or plastic wrap. Let rise in warm place until double in size, about 1 hour.

Preheat oven to 425°F. Lightly grease a baking sheet or two 9-inch round cake pans with olive oil. Dust with corn meal.

Punch down the dough. Shape dough into two balls. (At this stage, you can wrap one ball in plastic wrap before sealing it in a zip top bag and storing in the freezer for later use. Let it defrost in refrigerator overnight and then leave on counter to come to room temperature. Continue on from here.) Roll each ball into 9-inch round diameter; place on baking sheet, or press dough into cake pans. Cover with damp towel or plastic wrap; let double in size (about 45 minutes).

Make indentations in dough surface with fingers. Drizzle over the remaining 2 tablespoons of olive oil. Sprinkle with rosemary, olives and coarse salt. If you’re only making 1 loaf at a time, cut all amounts in half.

Bake 20 to 30 minutes or until brown.

Light Southern Biscuits

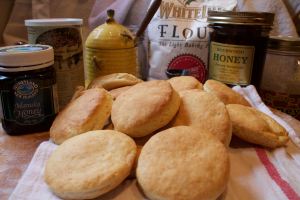
Flour does make a difference. I used to make my biscuits with whatever all purpose flour I had sitting around. These days, though, I have a bag of White Lily self rising flour that I use exclusively for making biscuits. These biscuits are terrific with honey (as you see, I have a bit of a selection to choose from).

biscuits and honey

Here is their easy and pretty darn foolproof recipe off the back of the bag:

White Lily Light and Fluffy Biscuits


2 cups White Lily® Enriched Unbleached Self-Rising Flour
1/4 cup Crisco® All-Vegetable Shortening, chilled
2/3 to 3/4 cups buttermilk or milk

Preheat oven to 500°F. Lightly grease a baking sheet.

Measure flour into large bowl. Cut in shortening with pastry blender until crumbs are the size of peas. Blend in just enough milk with fork until dough leaves sides of bowl.

Place dough onto lightly floured surface. Knead gently 2 to 3 times. Roll dough to 1/2-inch thickness. Cut using floured 2-inch biscuit cutter. Place on prepared baking sheet 1 inch apart for crisp sides or almost touching for soft sides.

Bake 8 to 10 minutes or until golden brown.

Sour Cream Chocolate Cookies

I wanted to make chocolate chip cookies today but there just wasn’t enough chocolate in the Toll House recipe to satisfy my craving. I also had only 1 egg and only 1 stick of butter. Therefore, I went into my files for a recipe Mom cut out of a magazine many years ago for sour cream chocolate chip cookies. These make a light but very chocolately cookie and no-one will know about the sour cream unless you tell them.

cookies

Sour Cream Chocolate Cookies

1/2 cup butter or margarine, softened
3/4 cup granulated sugar
1/2 cup packed brown sugar
1 egg
1/2 cup sour cream (don’t use light for this recipe)
1 teaspoon vanilla extract
1-3/4 cups all-purpose flour
1/2 cup unsweetened cocoa powder
1 teaspoon baking powder
1/2 teaspoon baking soda
1/4 teaspoon salt
1 1/2 cups bittersweet chocolate chips (can use semi-sweet, if desired)

Preheat oven to 350 degree F.

In a mixing bowl, cream butter and both sugars. Beat in egg, sour cream and vanilla. Sift together dry ingredients; gradually add to the creamed mixture. Stir in chips.

Drop by rounded
 tablespoonfuls about 2 inches apart onto greased baking sheets. Bake at 350° for 12 minutes 
or until set – do not overbake. They should still look kind of moist on top when you take them out. They will set as they cool.

Cool for 2 minutes before removing to wire racks to cool completely.

Makes about 3 dozen (unless, like me, you eat so much of the dough you only get about 24 cookies).

Mint Chocolate Chip Ice Cream

Over the winter, I made mint chip ice cream using peppermint schnapps. I had another craving for mint chocolate chip ice cream today but thought of the pretty color and flavor of creme de menthe, so that’s what I used as my base. I also used the rest of the bag of Andes Creme de Menthe baking chips I had lying around.

IMG_9722

Here is the recipe:

Mint Chocolate Chip Ice Cream

1-3/4 cups whole milk
3/4 cup sugar
Pinch salt
3 eggs, lightly beaten
1-3/4 cups heavy whipping cream
1 teaspoon Creme de Menthe
1/2 teaspoon peppermint extract
2 drops green food coloring, optional
1 cup Andes Creme de Menthe Baking Chips, divided

In a small saucepan, heat the milk to a near boil; stir in the sugar and salt until dissolved. Temper the eggs by whisking a small amount of the hot mixture to the eggs. Pour the eggs into the pan, whisking constantly. Cook and stir over low heat until mixture reaches coats the back of a spoon. Remove from the heat.

Cool quickly by placing pan in a bowl of ice water. Stir in whipping cream, Creme de Menthe, extract and food coloring if desired. Cover with plastic wrap, making sure to lay the wrap onto surface of custard. Refrigerate for several hours or overnight.

Fill ice cream freezer cylinder two-thirds full and stir in half of the baking chips. Freeze according to the manufacturer’s directions. Refrigerate remaining mixture until ready to freeze, remembering to add in the rest of the baking chips when ready to put in the ice cream maker. Transfer ice cream to a freezer container; freeze for 2-4 hours before serving.

Apple Fritters

We’ve made applesauce, dehydrated several dozen others and made applejacks but the gift of apples keeps on giving! As we still had five more in the fridge, it was time to make fritters!

Apple Fritters

2 cups all-purpose flour
1/2 cup light brown sugar
2 teaspoon ground cinnamon
2 teaspoon baking powder
1 teaspoon baking soda
1 teaspoon salt
2 eggs
3/4 cup buttermilk
2 tablespoons melted butter
1 teaspoons vanilla extract
3 apples, diced (if you want your fritters more tart, use Granny Smith apples)
vegetable oil, for frying
cinnamon sugar, for dusting

In a mixing bowl whisk together the flour, brown sugar, cinnamon, baking powder, baking soda, and salt.  In another bowl add the eggs and beat them with a whisk. Then add the buttermilk, melted butter, and vanilla extract. Whisk until combined. Add the wet ingredients into the dry and mix until just combined. Fold in the diced apples.

Heat an inch or two of oil to around 350-375 degrees in a cast iron skillet. Drop batter by the tablespoon into the hot oil. Fry until golden brown, being sure to flip the fritters so they brown on both sides. Drain on a paper towel lined plate. Then roll in cinnamon sugar.

These are best served warm.

IMG_20150802_192809

Michelle is currently experimenting on ways to cook these without frying. A pancake griddle works to cook the dough but leaves the apples very crunchy. It also does not leave a surface for the cinnamon sugar to adhere to. Next up was baking them in cupcake papers. While that cooked them through (including the apples), there was no crispyness to the outside. I guess she’ll just have to fry them like the rest of us!

A True Cornucopia!

Michelle has a freezer full of sweet corn that was put in there fresh out of the field. We cut the kernels off a number of the ears and got to work in the kitchen.

We started with making the base for sweet corn ice cream so it could sit in the refrigerator overnight and get good and cold before putting it in the ice cream maker. We also made corn fritters to go with our pulled pork sandwiches.

Sweet Corn Ice Cream

3 ears of fresh corn or 2 cups of corn kernels
2 1/2 cups milk
1 1/2 cup heavy cream
3/4 cup granulated sugar
6 egg yolks
Pinch salt
1/2 teaspoon vanilla

Remove the kernels off the corn and place in a saucepan with the milk, heavy cream, 1/2 cup of the sugar and place over moderate heat, stirring until it comes to a boil. Turn off the heat and allow the ingredients to steep for one hour, covered.

Remove about one cup of corn but don’t throw it out. Puree the mixture in the pot with a blender before returning to the pot. Bring this to a simmer. Meanwhile, whisk the egg yolks with the remaining 1/4 cup sugar. When the liquid comes to a boil whisk in about half of it to the yolks and stir rapidly to temper the eggs. Return to the pot and cook over low heat until the mixture covers the back of a spoon. Add the vanilla. Return the reserved corn to the ice cream base and pour into a container. Let it cool overnight in the refrigerator. Freeze according to the manufacturers directions of your ice cream maker.

11825656_10207503469802816_9150922248924480471_n

Corn Fritters

This recipe is slightly modified from the one Chef John Folse did on his show a few years ago. I believe his had both jalapeños and cayenne pepper in them.

4 ears fresh corn, divided
3 tablespoons cornmeal
1 large egg, lightly beaten
3 tablespoons all purpose flour
2 tablespoons heavy whipping cream
1 tablespoon minced onion
½ teaspoon salt
½ cup vegetable oil, or more as needed

Using a sharp knife, cut the kernels from two ears of corn. Transfer kernels to a small bowl. Grate kernels from remaining ears of corn on a grater into the same bowl. Using the back of a knife, scrape any pulp and corn milk from cobs into the bowl. Stir in cornmeal, egg, flour, cream, onion and salt, mixing well. In a large, heavy-bottomed skillet, heat oil over medium-high heat until shimmering. Drop spoonfuls of batter into hot oil. Fry until golden brown before flipping over to cook the other side. Using a slotted spoon, transfer fritters to a plate lined with paper towels. If necessary, add more oil to skillet and heat until shimmering then fry remaining batter. Serve fritters immediately.

11828729_10207503470962845_7928823320675552374_n

Enjoy!

Kicked Up Old Timey Applejacks

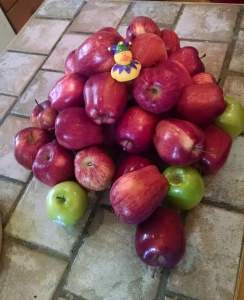
So I recently attended the GCLS Annual Literary Conference (and had a blast!). The participants (led by Karin Kallmaker) so very, very kindly donated their lunchtime apples to me:

FB_IMG_1438530086406

After almost 24 hours on th dehydrater, eight of those apples now looked like this:

IMG_20150801_181815

Time to make the Applejacks, a pocket sized hot apple pie. Mcdonald’s aint got nothing on this, though. We used as a starting place a recipe from Vivian Howard. My friend, Jeanine Hoffman, had left me some hard apple cider so we used that and it made something already good, awesome. and, as it takes a bit more than an hour to cook down, most of the alcohol had burned off by the time they had been softened, assembled and fried.

Kicked Up Old Timey Applejacks


For the filing:

2 cups dried apples slices, roughly chopped (or torn)
2 cups apple cider (we used hard cider)
2 cups water
1/4 cup sugar
zest of 1 lemon
1/2 teaspoon salt
3 tablespoons lemon juice

For the dough:

2 cups all purpose flour
1/3 cup shortening (we used butter flavored)
2/3 cup hot water

For frying:

2 cups shortening
cinnamon sugar for dusting

Make the filling:

In a large saucepan, combine all the filling ingredients and bring to a boil. Cook until the apples have absorbed all the liquid, about an hour. Transfer the apple filling to the refrigerator to cool while making the dough.

Make the dough:

Put the shortening in the middle of the flour and pour in the hot water. Using your hands, work the shortening and water together until it is sludgy. Work the flour into the sludge until it comes together and a soft, tender dough forms.

Make the pocket pies:

Pinch off a golf ball sized piece of dough and, on a well floured surface, roll out the dough into fairly thin rounds. Trim the dough for a more professional look or leave rough for a more handmade appearance. Put 1 to 2 tablespoons of the filling in the center, fold over and crimp the edges with a fork. Set on a floured baking sheet until ready to fry.

Fry and serve:

Heat half the shortening in a cast iron skillet over medium heat. Once the oil is hot, lay a single layer of applejacks in the pan and fry until golden on one side. Flip and fry the other side. It will take several batches to fry them all and you will probably end up using all of the shortening.

IMG_20150801_212147

Once the applejacks are golden on both sides, drain on paper towels. Sprinkle with cinnamon sugar. Serve warm or at room temperature.

IMG_20150801_212914

Delicious!