Make At Home Cheese Log

Call me weird but I collect those little bit of cheese left over from parties and cheese boards. I’m also the one who jumps at the chance to take home the cheese tray left over after meetings.

cheese tray

Why? Because with a very little bit of effort, they make a delicious cheese logs. From the above pictured cheese tray, I was able to make six logs.

cheese rolls

Here’s how:

Cheese Log

1 pound left-over cheese, at room temperature
1/4 cup dry white wine
1/4 cup ground pecans
3 tablespoons cream cheese, softened
1 garlic clove
paprika to cover

Remove any rinds from hard cheeses. Grate hard cheeses and cut others into 1/2-inch cubes. Place cheese, wine, cream cheese, pecans and garlic in a food processor and blend until smooth, approximately 2 minutes.

processed cheese

Remove from processor and put on wax paper to roll into logs.  As my Mom says, “Don’t make the rolls thicker than a Ritz cracker.” Allow to firm up in the refrigerator briefly before rolling in paprika for a pretty presentation.

ready to roll

Serve immediately or refrigerate for at least 1 hour for a firmer consistency.

As I generally wait to do this until I have a lot of cheese, I wrap each log really well in wax paper and then in plastic wrap and put them in a sealable plastic bag and freeze for up to six months. Pull out from freezer the morning of your event and thaw in the refrigerator until ready to serve.

Fried eggs

I’m not a fan of a lot of white with my fried eggs. I end up cutting the extra off at the table and that doesn’t look good on the plate.

Enter me browsing through John Besh’s My New Orleans cookbook and I see a cool egg recipe pictured with eggs and not much white. His recipe is a little odd but I decide to try it and it works! Not only does it let me cook distracted and not have to stand over the stove but the majority of the white just pulled away as I removed the cooked eggs from the pan.

1 tsp butter, softened
2 eggs
salt and pepper to taste

Take 9 inch, room temperature cast iron skillet and rub with the softened butter. Break the eggs in opposites sides and turn the burner on to medium low. Now, walk away! Toast the bread, heat the bacon, pour the juice. Come back to see if the yolk is at the proper consistency for your taste. Lightly salt and pepper. Remove from pan, leaving excess white.

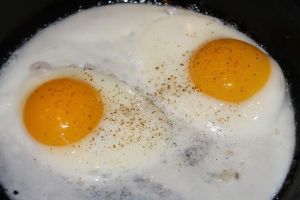
fried eggs

As you can see from the picture, a lot of the white spreads out, leaving two beautiful ovals of white surrounding the yolk.

Here is my happy breakfast on the plate:

happy breakfast

Yummy! Thanks, John!

Ghost Candy

I’m not too proud to admit being tempted by gourmet caramel and chocolate covered popcorn. However, the $11/bag price tag for Zebra Popcorn is just as rich as the goodness within the package. So, when I get to craving something crunchy, chocolately and peanut buttery, I make some Ghost Candy.

12 oz box of Crispex cereal
1 cup semisweet chocolate morsels
1/2 cup peanut butter
1/4 cup butter or margarine
1 tsp pure vanilla extract
1 cup powdered sugar, divided

Measure cereal, and set aside in a large bowl. If you think your bowl is large, enough, think again!  This one is 4 quarts and I still ended up with cereal on the floor.

bowl not big enough

In a double boiler, combine chocolate morsels, peanut butter and butter. Melt completely, stirring occasionally. Stir in vanilla extract. Pour mixture over cereal and stir using a spatula until evenly coated.

Divide cereal into 1-gallon sealable bags. Add half of the powdered sugar to each bag before sealing. Shake until cereal is well coated. Spread on waxed paper to cool.

muddy buddies

Store in airtight container (or reuse the bags) in refrigerator. Serve cold.

*Author note – In answer to a question asked on Facebook – yes, the name of these used to be Ghost Droppings as the dark chocolate covered in confectioners sugar look very much like what a ghost would poop.

Best Chicken Salad

I was watching America’s Test Kitchen the other day and was pretty shocked when they poached boneless, skinless chicken breasts in lightly salted water for their Waldorf chicken salad.

To have good chicken salad, you need to start with tasty chicken.  In my humble opinion, that means roasting the chicken not poaching it. I don’t care how silky the texture might be when you’ve brought no flavor to the party.

To start the process, I keep an eye out for the sales on chicken breasts and look for those with the rib bones and skin. At a local grocery store, I found some for .99 cents a pound.

I brought them home and put them in a marinade. As I needed to use up some lemons that were starting to look funky, I juiced those and then tossed in some garlic, rosemary and olive oil. They need to marinade for at least an hour but they can be left  in it for eight to twelve hours.

I roasted the breasts after balancing them on fingerling potatoes on baking sheets. This serves to cook the potatoes and keep the bottom of the chicken from getting soggy. For this preparation, I started the oven at 500 degrees F to help crisp the skin. After putting the chicken in, I immediately dropped the temperature to 325 degrees F. After 30 minutes, I switched the pans to even out cooking and then rotated them after another 30. Depending on the size of the chicken parts (and if they have bones), they should be getting close to done at 90 minutes. Baste the chicken every time you open the open door and pull them out when the internal temperature reaches 165 degrees F. These were very big breasts, so they took two hours.

roasted chicken

Enjoy a breast or two for dinner with the potatoes and allow the rest to cool completely. Strip off the skin and pick the meat from the bones. At this stage, I do a rough chop and put two cup measures into sealable freezer bags for storage.

For the chicken salad:

2 cup cooked chicken breast, chopped
2 stalks celery, diced
1 sweet pickle, finely chopped or 1 tablespoon of sweet pickle relish
1/4 cup pecans, chopped
1/4 cup mayonaise
salt and pepper to taste

Mix all ingredients together in a medium sized bowl.

chicken salad