Chocolate Chip Cookie Bars

Growing up, we called these Congo bars. Like chocolate chip cookies but with more chips and a gooey texture. I had some recently that added coconut, so I know they are still popular at potlucks. These aren’t blondies – the butter/shortening is melted before adding the sugar instead of creaming the two together. Here is a link to my blondie recipe.

Below is the version I’m using these days. The original recipe was in mom’s handwriting and called for oleo or shortening but I’m using about half and half butter and shortening. Using all shortening, you lose some flavor and the cookie bar crumbles. Using all butter, makes them too dense. Combined is the best of all worlds.

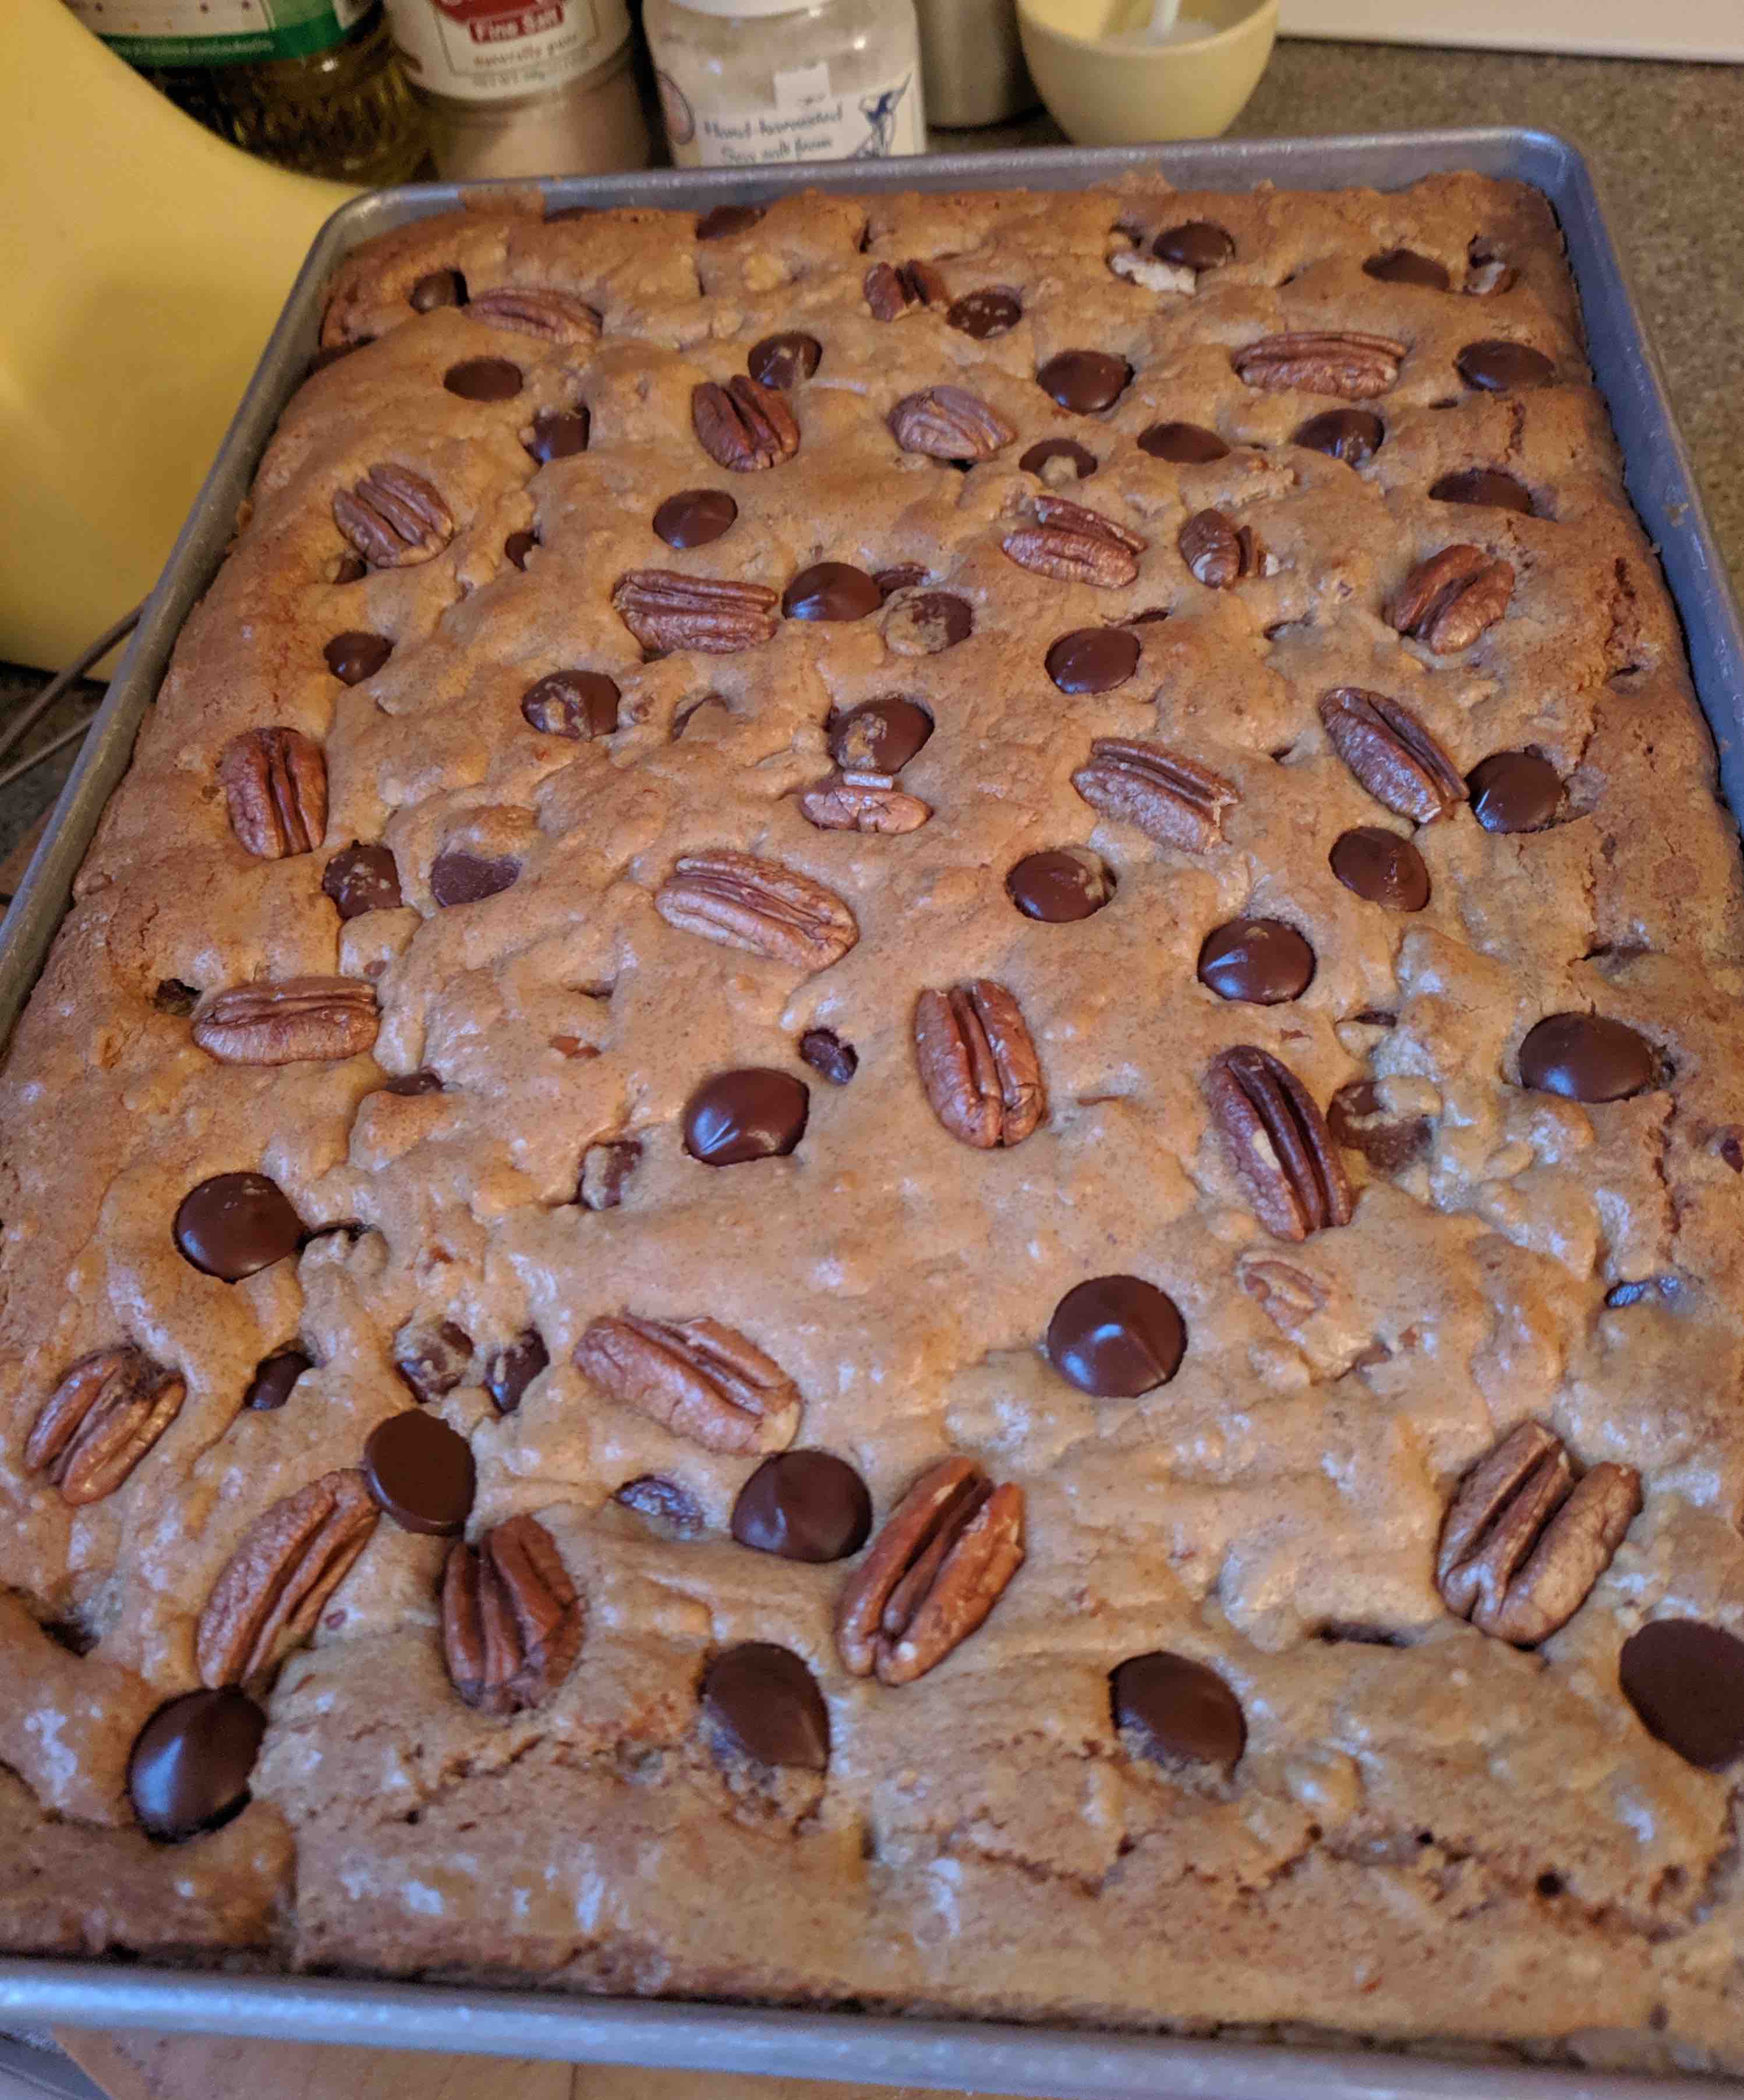
I’m also using bittersweet morsels instead of semi-sweet but put your preference in – heck, I’ve seen these with a mix of white and dark chocolate.

Chocolate Chip Cookie Bars

2 1/4 cups flour, sifted
2 1/2 teaspoon baking powder
1/2 teaspoon salt
6 tablespoons unsalted butter
1/3 cup shortening
2 1/2 cups brown sugar
3 eggs
1 teaspoon vanilla extract
1 cup nuts, roughly chopped – I use pecans
1 package chocolate morsels – I use bittersweet

Lightly butter a 9×13 pan.

In a medium bowl, sift together flour, baking powder and salt.

Melt butter and shortening in the top of a double boiler. Stir in brown sugar until well mixed. Allow to cool slightly before transferring to the bowl of a stand mixer.

Add eggs one at a time, beating well after each addition. Mix in the vanilla. Add dry ingredients, then nuts and chocolate.

Pour into greased pan. For a prettier presentation, I scatter a few whole pecans and some extra morsels on the top before baking at 350 degrees F for 30 to 35 minutes. It should be golden brown all over, with the edges a slightly darker brown.

When almost cool, cut into finger length bars or squares (my preference).

Mom’s recipe says it comes from the Milwaukee Sentinel newspaper, dated February 22, 1942. Google helped me find the link to the advertisement in the comics section of that paper.

Scotched Eggs

Taking bulk breakfast sausage and using it to envelop eggs is my new favorite thing. They’ve got all sorts of goodness going for them – creamy eggs, lots of hearty sausage, lovely seasoning and a crunchy coating.

They can be made to the breadcrumb stage and stored for later cooking or cooked and the leftovers rewarmed in a mix of microwave and toaster oven (to recrisp them).

When making more than four at a time, I recommend placing them in a muffin tin to bake. Otherwise, they will be okay on a rimmed baking sheet.

I used Grey Poupon Country Dijon Mustard but any good stoneground mustard will work.

Scotched Eggs

6 eggs, divided
1 lb bulk breakfast sausage
1 tablespoon stone ground mustard
flour, for dredging
1 cup breadcrumbs

Place 4 eggs in a saucepan and cover with cold water. Bring to a boil and turn off heat. Let sit for 5 minutes for slightly more than softboiled eggs or 9 minutes for hardboiled eggs. Run cold water over the cooked eggs and peel them, rinsing them again in cold water to stop the cooking.

Preheat oven to 400 degrees F.

Use your hands to mix the sausage and the mustard. Divide the sausage into 4 equal pieces. Wet your hands, and then take up one portion of meat. Pat into a thin patty from your fingertips to palm. Roll the egg in flour and then set near your fingers and fold the sausage around it, pinching the ends to seal it completely in sausage. Continue until all are enrobed in sausage

Beat remaining two eggs in a shallow dish. Dredge sausage balls in flour, then in beaten eggs and then in breadcrumbs. For an added crunch, use a breakfast cereal like Rice Krispies or Corn Flakes instead of the bread crumbs.

Set on a rimmed baking sheet or in a muffin tin. Bake for 30 minutes until crisp and golden.


Skillet Chicken Mushroom Pot Pie

I wanted some comfort food, so I decided to make a pot pie for dinner. My version includes chicken and onions and mushrooms and seasonings but none of those pesky peas, confounded carrots or other vexing vegetables. My version, in other words, is awesome.

I used large portobello mushrooms, sliced but most any mushroom would do. Make sure they are in bite sized pieces.

For this recipe, I’m using a Pillsbury Pie Crust for the topping. It is easy to thaw and unroll and tastes great.

Skillet Chicken Mushroom Pot Pie

2 skinless, boneless chicken breasts
1 tablespoons Worcestershire sauce
1/4 cup cornmeal
1 small onion, diced
8 ounces mushrooms, sliced
1 tablespoon unsalted butter
1 tablespoon all purpose flour
1 teaspoon ground black pepper
1 teaspoon kosher salt
2 teaspoons rubbed sage
1 cup low salt chicken stock
2 tablespoons sour cream
1 roll of pie dough
1 egg, beaten with a teaspoon of water

Preheat the oven to 425 degrees F.

Dice the chicken breast into bite-sized cubes. Stir them with the Worcestershire sauce and then toss with the cornmeal to coat. Set aside to marinate for 15 minutes.

Heat a large cast iron skillet over high heat and add in some oil. Turn the heat down to medium and sear the diced chicken until browned on all sides. Remove the seared chicken with a slotted spoon and place on a large plate.

Keeping the pan over medium heat, add in the onions and sauté until translucent, about 5 minutes. Toss in the sliced mushrooms and sauté until the mushrooms have reduced in size and given up their liquid. Remove from the skillet to a bowl.

Melt butter and stir the flour in the skillet over medium heat. Cook the roux for 5 minutes to make sure the raw flour taste is cooked away. Stir in the pepper, salt and sage. Pour in the chicken stock and turn the heat up to high and bring to a boil, scraping up any brown bits on the bottom of the skillet. Stir in the sour cream. Return the onions and mushrooms to the skillet and stir to coat with the pan sauce. Return the chicken to the skillet. Cook and stir until the mixture has thickened. Turn off the heat.

The pie crust should be about the size of your pan. If not, roll it out until it is just a little bigger than the pan, then place it over the filling, using a wooden spoon or scraper to push the edges down into the sides. Cut slices in the top to allow steam to escape during baking.

Brush the top with the beaten egg and bake for 20-25 minutes, until the pastry is golden-brown and the chicken juices are bubbling and overflowing.

Let the chicken mushroom pot pie rest for 5 to 10 minutes before cutting and serving.

Yummy!

Old School Puddin Pops From Homemade Chocolate Pudding Mix

Michelle makes me a cook and serve chocolate pudding mix that I store in quart jars and make whenever the urge for rich, creamy chocolate hits. This is better than the box mix as it is 1) cheaper and 2) a deeper chocolate with the high quality cocoa in it.

But, when August is panting her fetid breath on the back of your neck and you want more than just pudding, you can use the mix to make puddin pops. I have very fond memories of that creamy frozen dessert that can beat Fudgsicles for depth of flavor.

Alas, puddin pops are no more in the store but they can be in your home. For richest results use whole milk. While 2% will work, any less fat makes for a thin pudding and not the best texture puddin pops.

These are so good, they taste like I should make more. Good thing she made me a whole recipe of pudding mix!

Chocolate Pudding Mix

4 cups nonfat dry milk powder
2 2/3 cups sugar
1 1/3 cup corn starch
1 1/3 cups Hershey’s Special Dark cocoa powder
1/2 teaspoon salt

Mix all together and store in airtight containers.

To make pudding: Whisk 1 cup chocolate pudding mix into 2 cups milk in a saucepan and bring to a boil, stirring constantly. Pour into a glass dish or bowl and cover the top with plastic wrap to keep a skin from forming. Refrigerate until cool before serving.

Once you have your pudding mix, it is time to cook the pudding for puddin pops.

Puddin Pops

1 cup Chocolate Pudding Mix
2 cups milk
1 cup Cool Whip Whipped Topping

Place the pudding mix and milk in a saucepan and bring to boil, stirring constantly. Scrape pudding into a metal mixing bowl and place over a large bowl of ice and water and stir to bring the temperature down. Once the bottom of the bowl containing the pudding is cool to the touch, mix in the Cool Whip. Stir until completely incorporated.

Pour into molds and place in the freezer. It will take at least four hours to freeze.


Rosemary Fondant Potatoes

Fondant style potatoes traditionally means cutting potatoes into cylinders and then cooking them in broth to make them meltingly tender. I find trimming them to be a bit wasteful so I just slice off the barest ends of a bunch of Yukon gold potatoes and nestle them in a skillet with broth and butter and oil and cook them low and slow.

So good!

2 lbs smallish Yukon gold potatoes
2 tablespoons butter, softened
2 tablespoons olive oil
1 clove garlic, minced
1 tablespoon fresh rosemary, chopped
1 teaspoon kosher salt
2-3 cups chicken stock or broth

Trim the potatoes of any eyes or damaged areas and, for those you don’t trim, cut off the ends. Wash well in cold water and drain.

Stir together the softened butter, olive oil, garlic and rosemary. Toss the potatoes with the mixture. Arrange the potatoes in one layer in a 10-inch skillet. Pour in enough stock or broth to come up halfway of the potatoes and bring to a boil over high heat. Reduce the heat to low, cover the pan but leave the lid a tad ajar, and simmer until the potatoes are tender when pierced with a fork, about 20-30 minutes. The liquid should still halfway surround the potatoes; if it doesn’t, keep adding more broth or water until it does.

Once tender, press gently on each potato until they crack open. Return the pan to medium-high heat and boil, uncovered, until all the liquid has evaporated and the potatoes have browned on one side, about 10 minutes. Gently turn the potatoes and brown the other side, another 5 minutes or so.

Remove the pan from the heat and let the potatoes rest for 5 minutes before transferring them to a serving platter. Serve immediately.


Olive Cheese Log

I’ve written before about a quick and easy way to make a delicious appetizer (Make at home Cheese Log). Then I got to talking with Michelle about finding cheese in my freezer and my need to make a new one, she mentioned a cousin of hers who made one with olives. As we all know, I love the combination of cheese and olives (see my Olive Cheese Bites) so I set out to make my own version.

While many folks just form these into balls, I’ve always felt the ration of nuts to cheese gets a little off as you get to the center of the ball. Therefore, I roll mine out into logs instead.

You don’t need to do what I did and use leftover cheese – this is such a great appetizer, don’t wait until you’ve collected a pound of cheese ends and cubes leftover from events. Buy a block of cheddar and some cream cheese and you’re good to go!

Do not use grated cheese as the texture won’t be right. For the green olives, I used Manzanilla olives stuffed with pimentos for an added bit of color and flavor. You can also sprinkle a little paprika on them before rolling in pecans for presentation.

These logs freeze well. Wrap well and seal in an airtight bag. Thaw in the fridge.

Olive Cheese Log

1 lb block cheddar cheese, cut into cubes, at room temperature
1 – 8 ounce package
cream cheese, at room temperature
1/2 cup green olives, chopped
1/3 cup black olives, chopped
1 clove garlic, minced
1/2 teaspoon red pepper flakes (optional)
1 cup toasted pecans, chopped

Add all ingredients, except pecans, to food processor. Pulse until smooth. Remove mixture with rubber spatula onto two pieces of plastic wrap. Roll into a log shapes and chill in fridge for about 30 minutes. Remove from wrap and roll in the chopped pecans, pressing to adhere. Wrap the logs in another piece of plastic wrap.

Chill again for at least 30 minutes (or better, overnight) before serving with crackers.

Gabrielle Restaurant

I’m continuing my COOLinary New Orleans odyssey where you can get a 3 course dinner for $39 or less during the month of August. It is a perfect way to try out new restaurants or enjoy old favorites.

For dinner last night, I was able to go to Gabrielle Restaurant with my friends and local authors JM Redmann and Gillian Rodger. It is a small cottage in the Treme serving contemporary Creole cuisine. Gabrielle is a fairly casual place, where the bartender wandered to the planters out front to pick more mint for cocktails like the one I ordered:

It is called the JeniSu and is made of gin, champagne, mint syrup and lime. Very refreshing.

I neglected to get a picture of their starter of sea scallop wrapped in duck bacon!

My first course was meatballs three ways: Cajun duck, Italian veal, Greek lamb. Lovely flavor on each with rich sauces, too.

I ordered the Viennese Wienerschnitzel – crispy breaded veal over grilled eggplant. Yes, please!

Jean had the jambalaya – so much beautiful seafood!

Gillian had the fish filet served over a crabcake:

There were just as many varied dessert options as for the main course and they were all delicious. Jean had the chocolate pecan pie. It look very tasty.

Gillian had the bread pudding but the picture was blurry – sorry!

I had a bourbon milk punch with two moon pies. They call it shooting the moon and it was a smooth finish for a terrific evening.

For fine, casual dining Gabrielle will definitely go on my list of places to return. Everyone was friendly and attentive although they were super fast to clear plates so I left some of the delicious meatball sauce behind.

All in all, Greg and Mary and Gabrielle Sonnier have crafted a welcoming restaurant with a rich menu and ambiance that totally hit the spot. Thanks so much to Jean and Gillian for a wonderful experience.

Gabrielle Restaurant
www.gabriellerestaurant.com
504-603-2344
2441 Orleans Avenue
New Orleans, LA 70119


Coterie Restaurant NOLA

August in New Orleans can be tough to endure. To make things easier, there is COOLinary New Orleans, whereby local restaurants offer fixed price lunch menus for $20 or less. It is a perfect way to try out new restaurants or enjoy old favorites.

My friends Garrett and Leigh are in town as their son is looking at Tulane University as a potential place to go to college. I was very happy to join them for a meal, as it gave me a chance to eat at Coterie Restaurant and Oyster Bar in the French Quarter.

Coterie’s COOLinary lunch is two courses and I choose to have the boudin balls for my first course. The texture was terrific and the deep fried pork and rice balls had just the right amount of heat. The remoulade sauce served with them was tangy and refreshing.

For my second course, I choose the fried shrimp poboy (dressed, of course). A generous amount of shrimp, in a seasoned batter and deep fried to perfection.

The rest of the table ordered everything from charbroiled oysters to crabcakes to red beans and rice and jambalaya and it was all good. The chef’s take on traditional New Orleans food is very well done. Additionally, their bartender is also quite deft with the sazerac and hurricanes that started us off.

I would definitely recommend this restaurant, even outside of COOLinary!

COTERIE
504-529-8600
www.coterienola.com
135 Decatur St
reet
New Orleans, LA 70130

Stepping up the Gazpacho Game

I have a recipe for Simple Gazpacho that I blend up in just a few minutes and which I make several times a summer when the tomatoes are at their peak. However, for something to really knock your socks off, a few additional steps can mean a world of difference.

Roasting the garlic and onion deepens the flavors and takes out any harshness from having them raw. I also added roasted cashews as a thickener and for a hit of protein. You could use almonds instead.

Additionally, I used Aleppo pepper here for a lovely pepper taste without adding much heat but you can use a pinch of cayenne if you’d rather. As the flavor intensifies the longer it rests, don’t add so much seasoning you can’t eat the leftovers!

It is so pretty and oh, so delicious! Summertime never tasted so good!

Roasted Gazpacho


1 small head garlic (about 5-8 cloves)
1 small onion
1/4 cup olive oil, divided
2 lbs tomatoes – about 4 good sized
1 large cucumber
1 green bell pepper
1 slice bread, torn into chunks
1/4 cup sherry or red wine vinegar
1/3 cup cashews
1 teaspoon salt
1/2 teaspoon Aleppo pepper
1 cup V-8 or tomato juice

Preheat oven to 400 degrees F. Cut the top off the head of garlic. Place it on a piece of aluminum foil and drizzle generously with olive oil and seal the foil around the bulb. Roast for about 30 minutes or until tender. Squeeze out the softened garlic and let cool.

Quarter the onion and separate the layers. Toss generously with olive oil and place on a baking sheet in the oven with the garlic. Roast until the garlic is done, flipping layers over once during baking.

Wash the tomatoes and cut small x’s in both ends. Place in boiling water for 2 minutes. Remove to an ice water bath. Peel off skin, core and quarter. 

Peel cucumber, scrape the seeds out with a spoon and cut the cucumber into chunks. Core and seed the bell pepper and cut into large pieces.

Soak the bread in the sherry vinegar. While adding the bread isn’t necessary, I find it thickens the soup and mellows the flavors.

Pulse the cashews in a food processor until they become a fine meal.

Combine tomatoes, cucumber, bell pepper, onion and garlic in the food processor with the nuts and pulse several times. Scrape down the sides with a rubber spatula. Add in the sherry vinegar soaked bread, then drizzle in the remaining olive oil, salt and Aleppo pepper until well combined. Add just enough V-8 or tomato juice until the soup reaches the desired consistency. It should not be thin or watery but neither should it be the consistency of a smoothie, either.

Chill for several hours or overnight. Taste for seasoning before serving. Serve with fresh bread.

Michelle made a gorgeous loaf of crusty bread to go with our soup.

Yummy! I’ll see if she’ll give me the recipe for blogging.

Spicy Sweet Potato Fries

These sweet potato fries are some of Michelle’s favorite. She likes the seasoning blend a lot but she also likes how they are like thick cut fries but are so soft and tender.

I like ’em because I can pretend I’m eating healthy when I have them.

Either way, you should give these a try next time you have a craving for sweet potatoes.

Spicy Sweet Potato Fries

3 medium sized sweet potatoes
3 tablespoons olive oil, divided
2 teaspoons kosher salt
1 teaspoon onion powder
1 teaspoon garlic powder
1 teaspoon paprika
1/2 teaspoon cumin
1/2 teaspoon chili powder

Preheat oven to 400 degrees F.

Mix all the spices together in a bowl.

Slice sweet potatoes into 3/4 inch wedges. Toss with 2 tablespoons olive oil. Toss with 3 teaspoons of the spice mixture (remaining spice mix can be stored in an airtight container).

Use remaining olive oil to coat a large baking sheet. Place sweet potato wedges in a single layer on baking sheet, skin side facing the same way (to make it easier to know which you’ve flipped later). Bake for 20 minutes. Remove pan from oven and turn wedges over and bake for another 10-15 minutes. They are done when soft and tender.